Discover in-depth articles on structural design, luxury finishes, sustainable materials, and practical packaging solutions for modern brands.
Choosing custom tie rigid boxes is more than selecting a color and adding a logo. The box is often the first physical sign of your brand’s care. A crisp lid, smooth paper wrap, and secure insert can make a tie feel considered before it is even touched. Design researcher Don Norman offers a useful principle: “Good designs fit our needs so well that the design is invisible.” For a tie box, that means beauty should support the experience, not complicate it.
Start with the tie itself. Measure its folded length and width, then allow enough room for a gentle fit without letting it slide. Consider how customers will open the box, store it, or carry it home. A magnetic closure can feel refined, while a lift-off lid may suit a quieter, traditional brand. The insert matters too. It should hold the tie neatly without crushing the fabric or making removal awkward.
Then match materials and finishes to your brand’s real priorities. A textured paper wrap can add tactility; foil stamping can draw attention to a small emblem. But more decoration is not always better. And budgets matter. Think about order quantities, shipping weight, and how the box looks beside your other packaging. A sample in hand can reveal problems a screen cannot: a lid that catches, a color that shifts, or an insert that feels too tight. This guide explores those choices so your custom tie rigid boxes protect the product and express your brand with purpose.
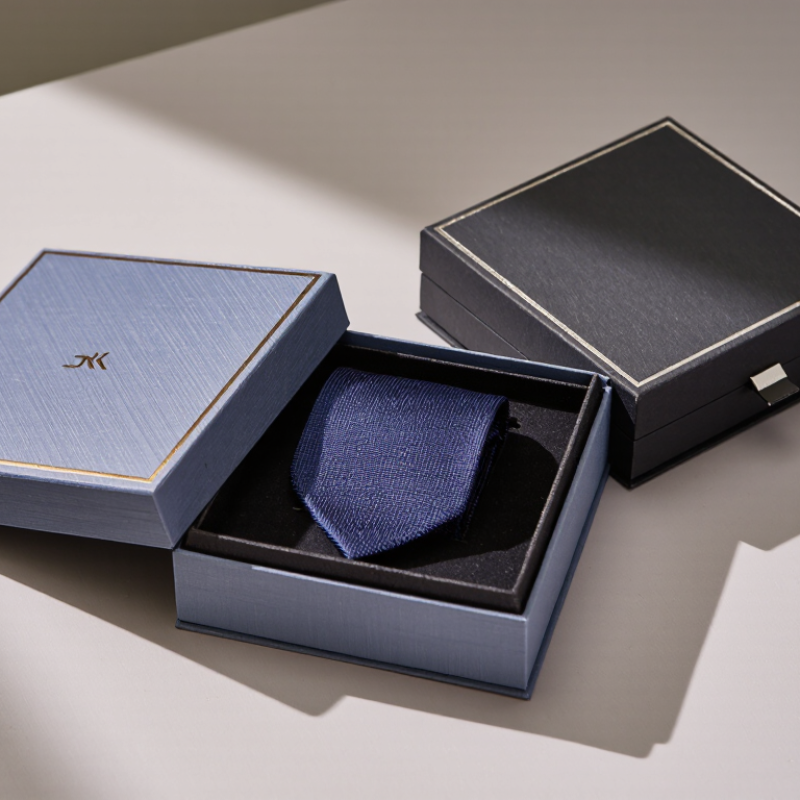
Start with the job the box must do. Is it protecting a silk tie in transit, creating a gift-ready reveal, or encouraging repeat purchases? Custom tie rigid boxes can support all three, but each goal calls for different choices. A snug insert helps prevent creases. A lift-off lid can make gifting feel deliberate. Yet extra layers may add bulk and cost, so check a filled box in your actual shipping carton.
Know who will open it. A corporate gift buyer may value neat presentation and easy storage. A younger online customer may care more about compact delivery and recyclable materials. PwC’s 2024 Voice of the Consumer Survey found that 80% of global respondents were willing to pay more for sustainably produced or sourced goods, with an average stated premium of 9.7%. That is a broad sustainability signal, not proof that every customer will pay extra for a greener box. Test preferences with real buyers when possible.
Tips: Write down your main goal, target customer, budget, and shipping conditions before requesting samples. Compare box size, insert fit, opening experience, and material claims. Ask customers what they notice. Their answers may challenge your assumptions.
Measure the tie in its intended folded position before choosing the box. Include the knot, blade, and any fabric keeper in your measurements. Leave enough room for tissue or a simple insert, but avoid a wide empty gap. A tie that slides during shipping can arrive creased. The first sample may still feel too roomy. Adjust it after testing.
A long rectangular rigid box suits a neatly folded tie and uses space efficiently. A wider shape can make room for a pocket square or care card, but it should not make the tie look lost. Check the interior height as well as length. A raised insert may protect the knot, yet it can press against delicate fabric if fitted too tightly. Test with the actual tie, not a paper mock-up.
Choose a closure that fits how customers will open and reuse the box. A magnetic flap offers quick access and a tidy presentation. A lift-off lid feels more traditional, while a drawer style can hold an insert securely. Check that the lid stays shut when the box is tilted. Small details matter. A closure that feels stiff may frustrate people, even when the box looks polished. Inspect a filled sample for shifting, pressure marks, and easy opening before approving production.
Choose the box size, shape, and closure to suit how each tie is folded and presented.
Suggested starting-point internal dimensions: slim drawer box, 36 × 10 × 3 cm; classic lift-off-lid box, 38 × 12 × 3.5 cm; gift-style magnetic book box, 40 × 14 × 4.5 cm. These are design recommendations, not universal standards. Test each box with the actual tie, fold, and insert before production; allow enough clearance for easy placement and removal.
A custom tie box should feel firm before it looks luxurious. Choose rigid board that resists corner dents, then check that the lid closes without bowing. A paper-wrapped surface can soften scuffs, but the board beneath it does the structural work. For the interior, use a fitted cradle or paperboard bridge to keep a rolled tie from sliding. Add a smooth facing where silk touches the insert; rough cut edges can catch delicate fibers. Fit matters more. Test a packed sample with repeated handling and drops, not just a desk display.
The U.S. Environmental Protection Agency’s 2018 Advancing Sustainable Materials Management report estimates that containers and packaging made up 28.1% of U.S. municipal solid waste. That figure is a useful prompt to avoid oversized boxes and excess filler, though it does not measure tie packaging alone. A snug insert can reduce movement while keeping the presentation clean. Paperboard or molded-fiber supports may suit brands seeking fiber-based components; foam can offer cushioning, but complicates material separation. Small tests help. Check compression at the lid, abrasion around the knot, and whether the tie shifts during transit. A rigid box can still fail at its weakest corner. And a beautifully tight fit may become annoying if customers struggle to lift the tie out.
| Selection Factor | Option or Reference | Typical Specification | Protection and Presentation | Best Suited For | Points to Check |
|---|---|---|---|---|---|
| Rigid box board | Greyboard / chipboard | Commonly about 1.5–2.5 mm thick; select thickness based on box size and expected handling. | Provides a firm structure that helps resist crushing during storage and shipping. | Most presentation boxes for folded neckties. | Ask for a physical sample; board thickness alone does not determine finished-box strength. |
| Outer wrap | Printed paper, specialty paper, or fabric-textured paper | Choose the surface finish and paper weight to suit the desired look and converting method. | Creates the visible finish and can help protect the board surface from scuffs. | Retail gifting, premium presentation, or coordinated packaging sets. | Check color consistency, edge wrapping, rub resistance, and compatibility with foil or embossing. |
| Box format | Shoulder-neck, lift-off lid, or book-style box | Choose the format after confirming the folded tie dimensions and preferred opening experience. | A well-fitted lid helps keep the contents enclosed; a book-style format can hold an insert securely. | Shoulder-neck for a refined reveal; lift-off lid for simple access; book-style for organized presentation. | Check lid fit and opening clearance with the finished insert and tie in place. |
| Interior dimensions | Fit to the folded product | Measure the tie after folding, including its widest point and thickness; allow practical clearance for insertion and removal. | Reduces excess movement without compressing the fabric. | All tie boxes, especially styles with thick lining or a bulky knot fold. | Test with the actual tie; fabric, fold method, and accessories can change the required fit. |
| Protective insert | Paperboard platform or shaped paperboard insert | Use a die-cut or folded insert sized to support the tie and keep it centered. | Helps limit shifting and can separate the tie from the box walls. | Lightweight presentation packaging and paper-focused packaging designs. | Ensure edges and cutouts are smooth and do not snag delicate fabric. |
| Cushioning insert | Foam insert or covered foam insert | Specify foam type, thickness, and cavity dimensions with the packaging supplier. | Provides cushioning against vibration and minor impacts when correctly fitted. | Gift sets or shipments that need additional movement control. | Check that the insert does not crease, stretch, or leave pressure marks on the tie. |
| Fabric-contact surface | Soft lining paper or fabric-covered insert | Select a smooth, colorfast material that is compatible with the tie fabric. | Creates a softer contact surface and improves the unboxing presentation. | Silk, fine woven fabrics, and higher-presentation packaging. | Test for lint, dye transfer, abrasion, and snagging before production. |
| Moisture management | Protective outer shipping packaging; optional desiccant where appropriate | Choose based on storage and transit conditions; keep any desiccant separated from direct fabric contact. | Outer packaging can reduce exposure to dirt and handling; desiccant can help manage moisture in a sealed package. | Longer storage or routes with changing humidity. | A rigid box is not automatically moisture-proof; assess the complete packed shipment. |
| Shipment protection | Corrugated outer carton with suitable void fill | Choose carton strength and internal clearance based on packed weight, shipping method, and carton quantity. | Helps protect the rigid box from impact and compression during transport. | E-commerce orders, multi-box shipments, and longer distribution routes. | Conduct a packed-shipment test; the presentation box alone may not provide sufficient transit protection. |
| Quality checks | Sample fit, lid operation, finish, and packed-shipment review | Approve a production sample before confirming the final specification. | Helps identify fit, finish, and protection issues before a full production run. | Every custom rigid-box project. | Check tie placement, insert retention, lid alignment, surface marks, and the condition after handling. |
Selection tip: Base the final box and insert dimensions on a production sample of the folded tie, then test the fully packed box inside its shipping carton.
Custom tie rigid boxes should make the product feel considered before the lid is opened. Start by defining what the packaging needs to communicate: formal, modern, understated, or gift-ready. Choose a base color that supports that impression and stays consistent with your printed details. A deep navy box with a small metallic logo feels different from a pale box with crisp black lettering. Check colors under both warm indoor lights and daylight. A shade that looked elegant on screen may appear dull on paper.
Tips: Request a physical sample. Compare the box beside the tie fabric, not just on a monitor. Keep essential text readable at actual print size. Small lettering can disappear against textured paper.
Finishes add contrast, but each should have a clear purpose. Foil stamping can draw attention to a logo, while a matte coating keeps reflections low and gives the box a quieter look. Embossing adds a tactile detail; use it sparingly so the surface does not feel crowded. Ask your packaging supplier about how coatings affect color and scuff resistance. Also review the dieline before approving artwork, especially around folds and edges. A logo placed too close to a seam may look awkward. It is easy to miss that detail in a flat proof. Keep the final layout simple enough to read quickly, then inspect a finished sample before placing a larger order.
A tie box can look polished in a rendering and still arrive with a loose insert or scuffed corners. Review a physical prototype in daylight. Check that the tie lies flat, the lid closes evenly, and the hinge survives repeated opening. Smithers’ report The Future of Global Packaging to 2028 projected the global packaging market would exceed $1.2 trillion by 2028, reflecting the scale and variety of packaging supply chains. For your order, though, a large market is no guarantee of consistent work. Ask for material specifications, a production sample, and documented quality checks.
Tips: Test a filled prototype, not an empty box. Rub the surface with clean, dry fabric, inspect the corners, and compare several samples for color and fit. I still find studio lighting misleading. It happens.
When assessing suppliers, request details on board grade, wrapping paper, insert materials, tolerances, minimum order quantity, and lead time. Ask how defects are recorded and what happens if a production batch differs from the approved sample. If possible, review a recent run or request photos from multiple stages. A reliable supplier should explain trade-offs clearly, including where a lower-cost material may crease or show glue marks. Small imperfections can be useful signals; do not ignore them just because the sample looks attractive.
Start with its main job: protect a silk tie, create a gift-ready reveal, or encourage repeat purchases. Write down your budget and shipping conditions. Keep it practical.
A fitted cradle or paperboard bridge can hold a rolled tie in place. Add a smooth facing where silk touches the insert. Test for snags.
Compare the filled box with your actual shipping carton. Extra layers may add bulk and cost. A snug fit is useful, but not if removal becomes difficult.
Rigid board helps resist corner dents, while a paper-wrapped surface can soften scuffs. Paperboard or molded-fiber supports may suit fiber-based designs. Check how materials separate.
Ask for clear material details and avoid oversized boxes or excess filler. Customer preferences vary, so ask real buyers. Do not assume everyone will pay more.
Test a filled sample in daylight. Check the lid, hinge, insert fit, tie position, corners, and surface scuffs. Studio lighting can mislead.
Handle and drop a packed sample, then inspect compression, abrasion near the knot, and movement inside. Open and close the lid repeatedly. Small tests matter.
Request board grade, wrapping paper, insert materials, tolerances, minimum order quantity, and lead time. Ask how defects are recorded and what happens if a batch differs from the approved sample.
Choosing custom tie rigid boxes starts with defining your packaging goals and understanding the customers you want to reach. Consider whether the box should emphasize presentation, protection, gifting, or convenient storage, then select a size, shape, and closure that hold the ties neatly without excess space. A sturdy rigid material can help protect the contents, while a well-planned interior insert keeps ties in place and supports a polished unboxing experience.
Next, coordinate colors, finishes, and printed details with the look and feel you want to create. Keep the design clear and balanced so key information is easy to notice. Before placing a full production order, review prototypes for fit, appearance, and construction quality. Comparing supplier capabilities, sample quality, communication, and production expectations can help you choose an option that delivers consistent custom tie rigid boxes for your needs.